What is EC2 and How To Easily Setup Your Own Web Server In AWS Cloud (2023)
Your step-by-step AWS EC2 tutorial for quickly launching a web server at AWS
Launching a new web server at AWS (Amazon’s cloud service) can be a daunting and confusing process. There are many things to consider, from choosing the right platform to configuring security settings.
We’re going to explain what is EC2 and cloud computing. Then we’re going to show you how to launch a web server in Amazon Web Services(AWS cloud services) in just 10 minutes. We’ll walk you through the steps, and provide tips for optimizing your setup. We’ve removed all the noise and provided you with the core details so you can have your own server set up correctly in a very short time.
What is Amazon EC2?
Amazon EC2 stands for Amazon Elastic Compute Cloud. It’s the service on Amazon Web Services that allows you to “create and rent” a virtual server (or Virtual Machine). AWS cloud allows you to create, replicate, update, and delete server instances in minutes. Through your AWS account, you can create on-demand instances using scalable computing capacity. You can scale your entire organization’s infrastructure with a simplicity that did not exist just a few short years ago.
Perhaps you’d like to create a new AI tool that utilizes OpenAI’s GPT-3 engine. Then creating an Amazon EC2 instance is a good place to start.
Amazon EC2 Pricing
For this demonstration, we’ll be using the Free-Tier setup for most options, so the cost will be near zero. Please understand that “Free-tier” doesn’t always mean absolutely free. There are limits to what is free and these limits are set pretty low. From the Amazon EC2 website:
As part of the AWS Free Tier, you can get started with Amazon EC2 for free. This includes 750 hours of Linux and Windows t2.micro instances (t3.micro for the regions in which t2.micro is unavailable), each month for one year. To stay within the Free Tier, use only EC2 Micro instances.
https://aws.amazon.com/ec2/pricing/
If you need to “guesstimate” your costs for your server instances, Amazon has an AWS Pricing Calculator that will help you. Obviously, overall costs will depend on the horsepower of the virtual machine you set up and for how long you keep it running.
Features of Amazon EC2
- Scalable computing capacity – Amazon EC2 allows you to increase or decrease capacity in minutes
- You have complete control – you have complete control of your instances
- Reliability – You are using Amazon’s cloud computing experience and their virtual servers architecture.
- Secure – Amazon’s infrastructure is one of the most secure systems in the world.
- Inexpensive – You can create an Amazon EC2 server instance and only use it (and be charged) for one hour per day. Perhaps you want to create a proof of concept server instance for a few days and then delete it. It’s simple, quick, and cheap to do that.
- Easy to begin – There’s no lengthy installation of software and manual handling of a server. Everything is done via the Amazon Management Console website and takes minutes to complete.
So there are numerous benefits to creating a cloud computing server instance in Amazon EC2. Are you ready to get one set up quickly? Let’s do this!
Step 1: What Are Key Pairs
Key Pairs is how AWS authenticates you when you need to log into the server itself.
They allow you root access to your servers.
Technical Answer: Key pairs are used to authenticate SSH connections to your instances. A key pair, also known as a “.pem” file on Linux and Unix systems, consists of a private key and a public key. The private key is kept on your local computer and should be securely protected. The public key is uploaded to AWS cloud and placed on your Amazon EC2 (Amazon Elastic Compute Cloud) instance. When you connect to your instance using SSH, the client software presents the private key for authentication. If the server recognizes the public key that corresponds to the private key, it authenticates the connection.
Simpler Answer: AWS uses a “Key Pair” combination that is unique to you for security access to pretty much everything AWS. You need to create this combination (which we show you first) in order to control your web server.
The Key Pair is completely separate from your username/password combination that you use to log in to the AWS web portal. AWS defines a Key Pair as so: “A key pair, consisting of a public key and a private key, is a set of security credentials that you use to prove your identity when connecting to an Amazon EC2 instance.”
The Key Pairs is how AWS makes sure you are who you say you are. It allows you root access to your servers, which means full administrative access. Do not lose these or share them with strangers.
Create Your Key Pairs
- Sign up for an AWS account using the AWS Management Console(or sign in if you already have an AWS account) at https://aws.amazon.com
- In the Search Bar at the top of the page, search for “EC2” or “Elastic Compute Cloud”. Click on the result that says “Virtual Servers in the Cloud”. It should be the top result. Click on it. Currently, it’s located at https://console.aws.amazon.com/ec2/
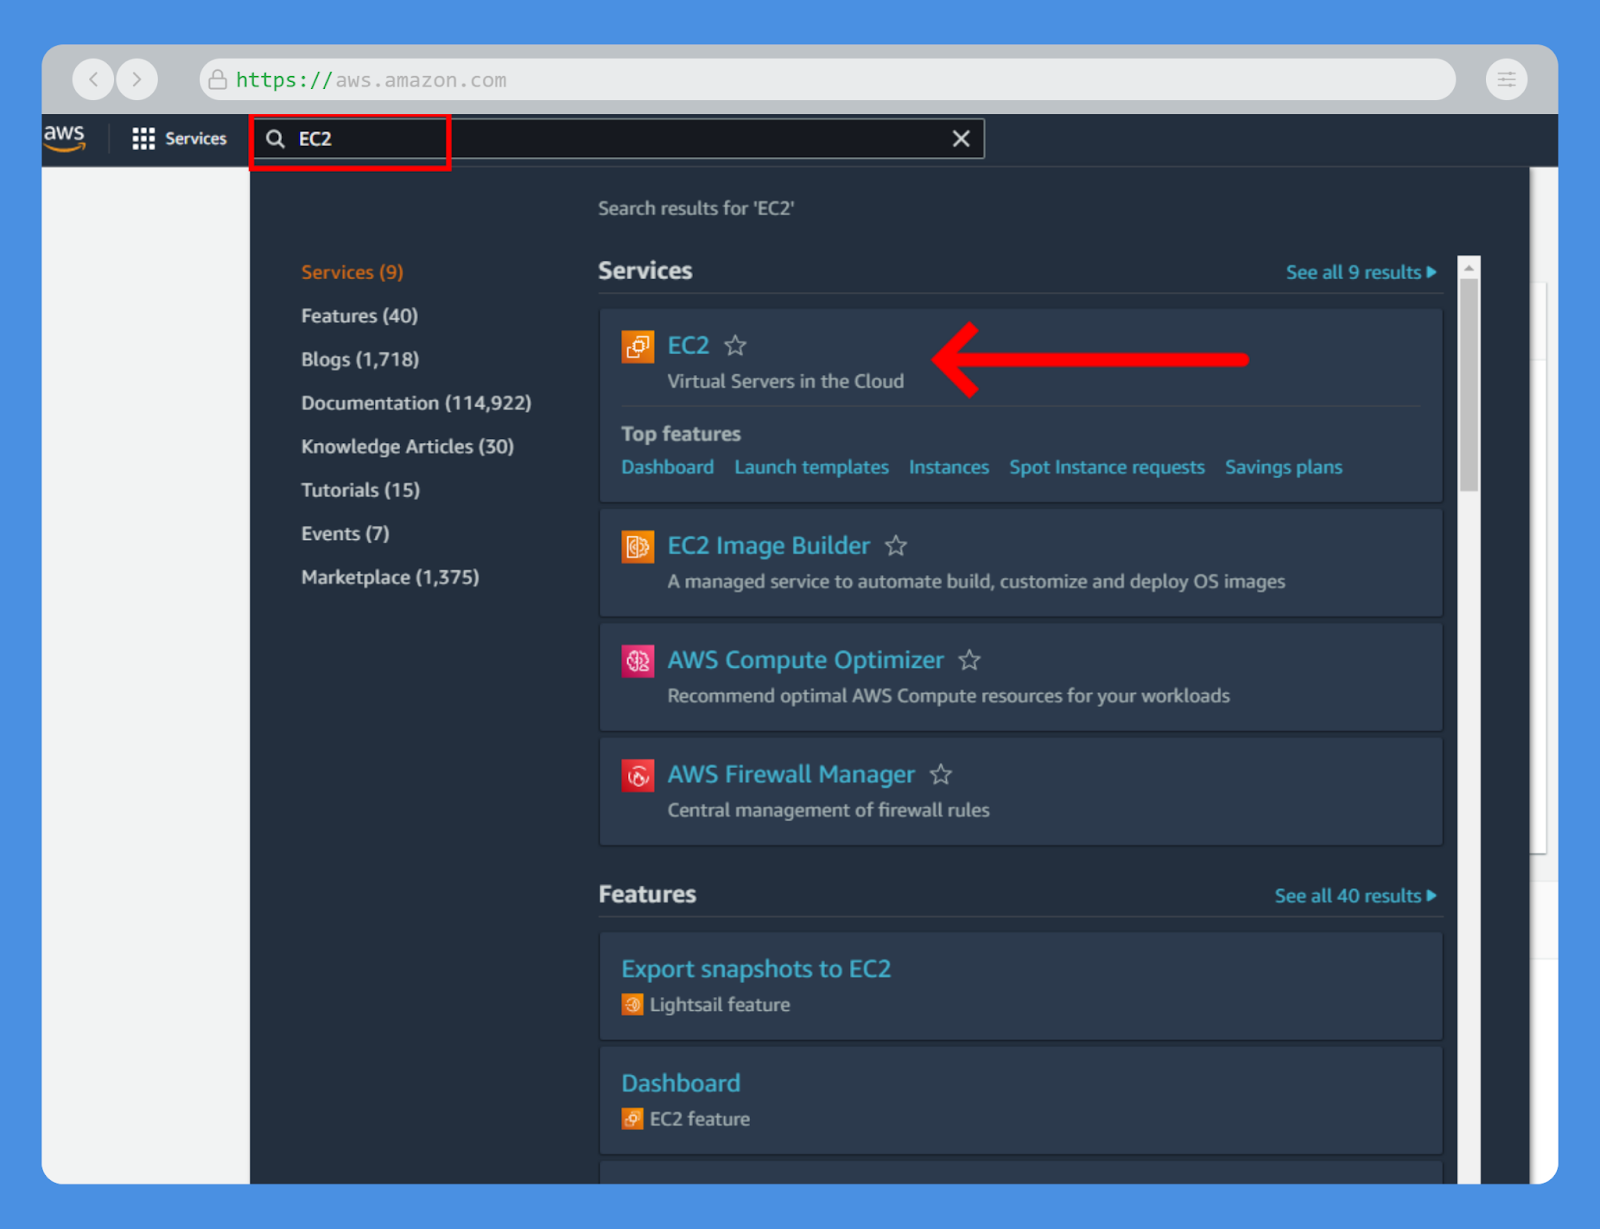
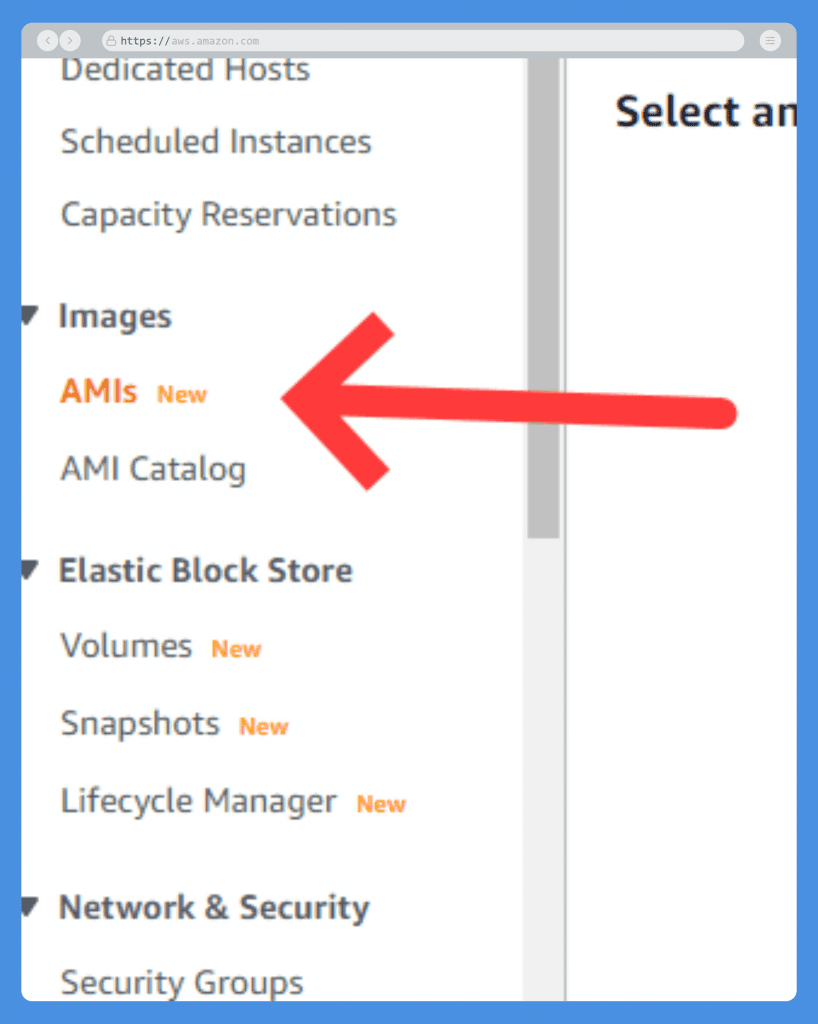
- In the left navigation column, under “Network & Security”, click on Key Pairs.

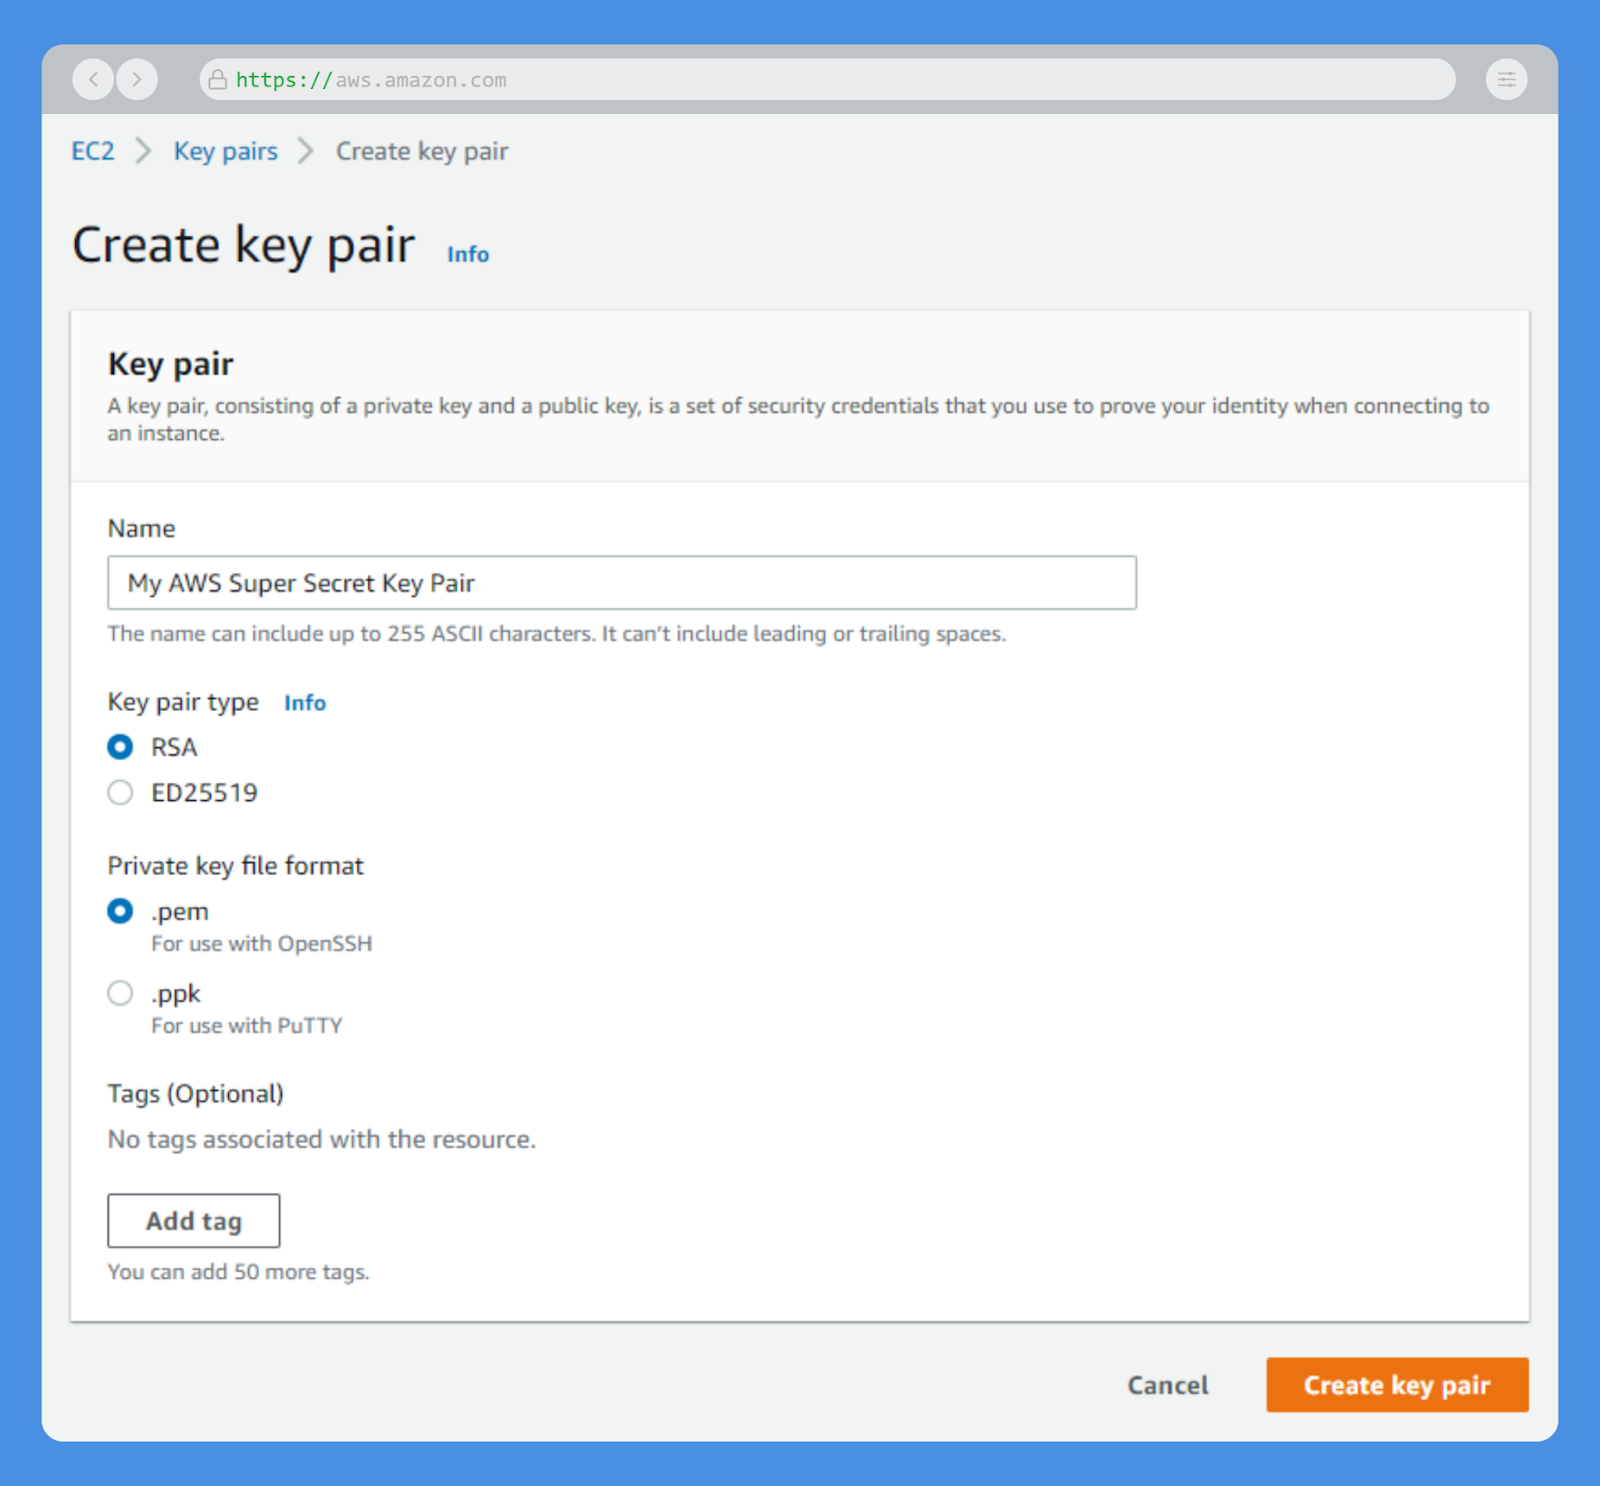
- Click on the “Create key pair” button on the top right.
- Use the following information:
- Name: “My AWS Super Secret Key Pair”
- Key pair type: “RSA”
- Private key file format: “.pem”
- Hit the “Create key pair” button.
The file should automatically be downloaded to your computer. This is the only time that you’ll have access to this file. It will never be created again. Store it someplace safe.
Note to Mac or Linux computer users – you have to set this file so only you can read it. If you don’t do this, it won’t work correctly to connect to your server instance. To do this, follow the following two steps:
- Go to the directory where the .pem file is located.
- Type “chmod 400 My AWS Super Secret Key Pair.pem” (replace with file name, of course).
- Rest as this is now complete.
Step 2: Create an Amazon EC2 Instance
Now the fun part. We get to create our own server and have it ready in a matter of minutes. Let’s do this.
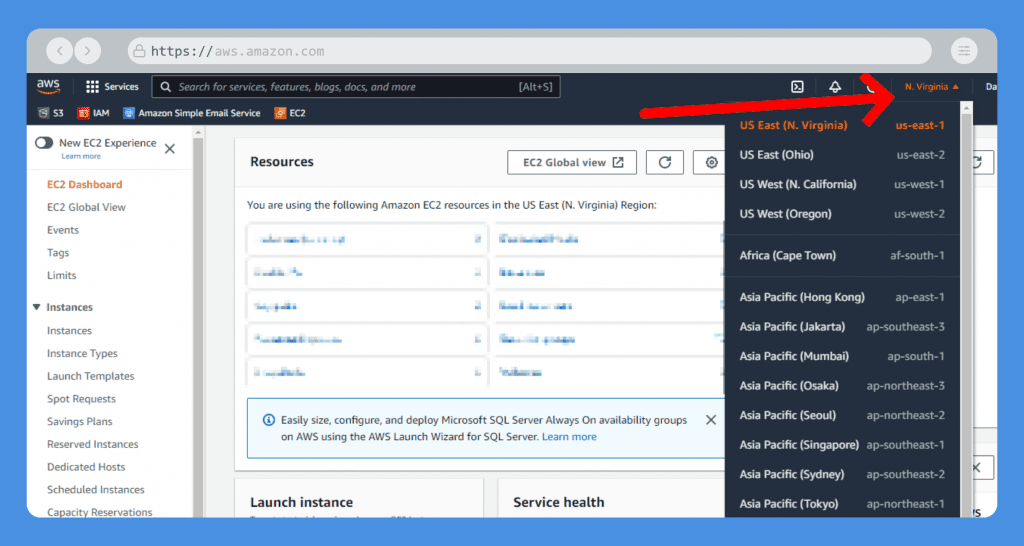
Select the Region That Your Server Will Reside
Select a region at the top right. This is the location that your Web Server will actually reside. In North America, just choose N. Virginia for this example. Once we select the region, we don’t want to change it again during this tutorial.
A few things about AWS regions:
- Each AWS region is built to be isolated from all other AWS regions. This allows for the greatest possible fault tolerance and a high level of stability in the region.
- If you have a majority cluster of end-users in a particular geographic location, you might choose to have your server close to them.
- It’s also important to know that not all resources and functionality exist in every region. The isolation that exists means that AWS rolls out functionality to regions separately.
- Also, your Console Home is specific to a Region.
Select an Amazon Machine Image (AMI)
Let’s go back to the main Amazon EC2 page. Search for EC2 in the search bar at the top of the page.
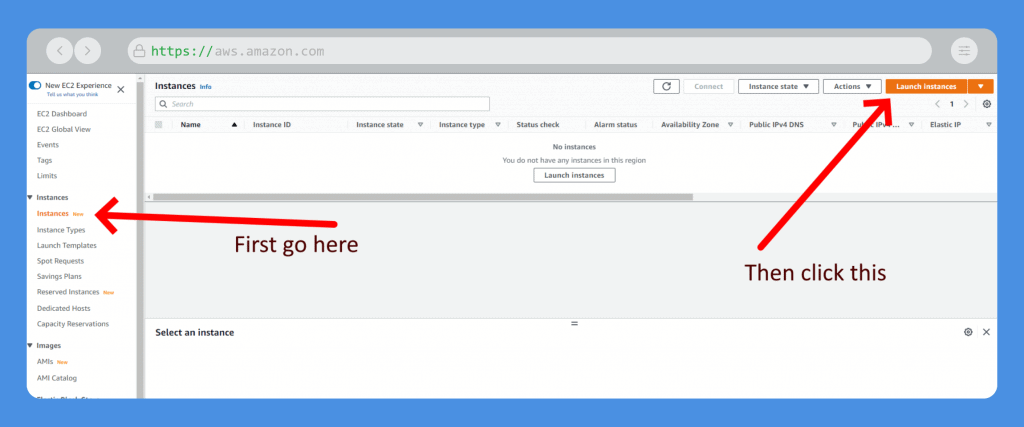
Select “Instances” in the left-hand navigation. This is the area where you will maintain all of your on-demand instances once they’re set up. Go ahead and click on “Launch Instances” in the top right corner.
This next screen is where you will select the size and power of your server.
Start by naming your new server. This is a name for display purposes, so make it easy. I might name it: “Ubuntu with PHP #1”, or “Windows for C# Development”. The name is actually a “tag”, and it can be altered later if you desire.
The next area is where you’ll be presented with AMI options. AMI stands for Amazon’s Machine Image, and these are basically pre-configured servers with various operating systems. Do you want a Microsoft Windows server or Linux or something else? This is when you make that decision.
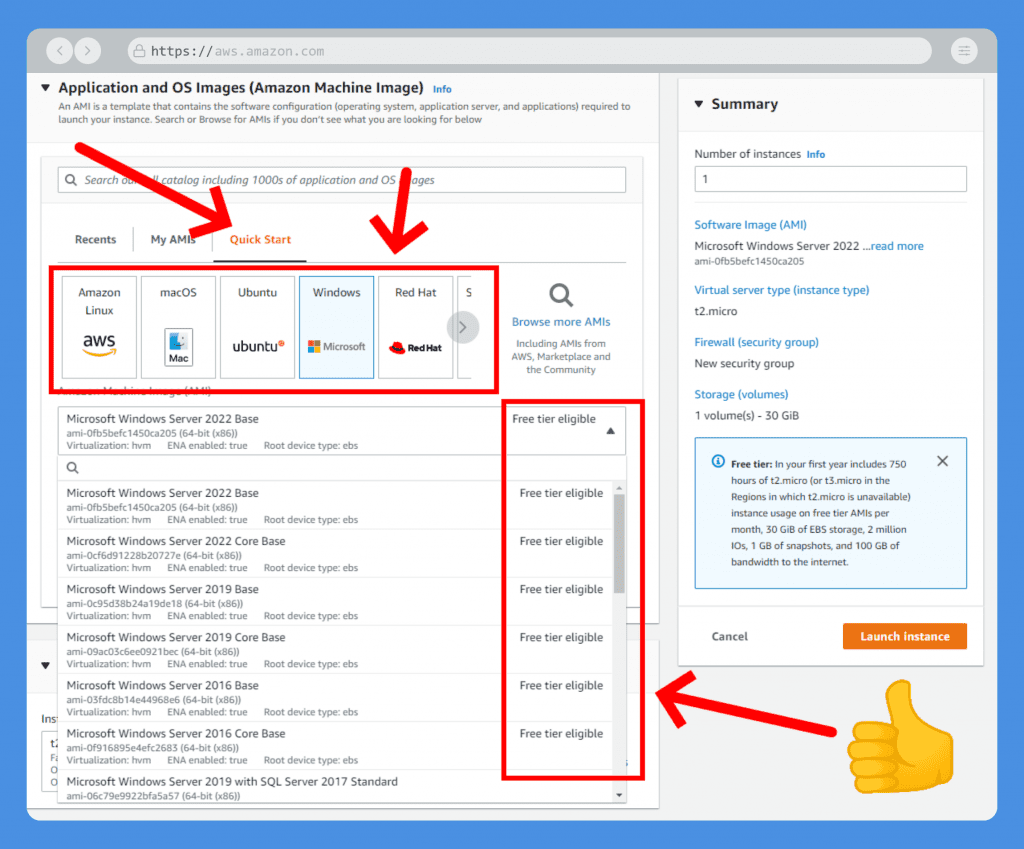
We’ll stick with the “Quick Start” tab and click the box that represents the operating system you want running your server. The drop-down box immediately below will change and give you the list of AMIs that Amazon recommends. Free Tier is what we’ll use for this example. These are great for development purposes or for simply learning AWS services.
I use both Windows-based servers and Linux-based servers. If you’re planning on running applications that need PHP and MySQL, then consider choosing one that has that pre-installed. But you can always install it afterward also…just trying to save you some time. When you’ve located the server AMI you want, select it in the drop-down.
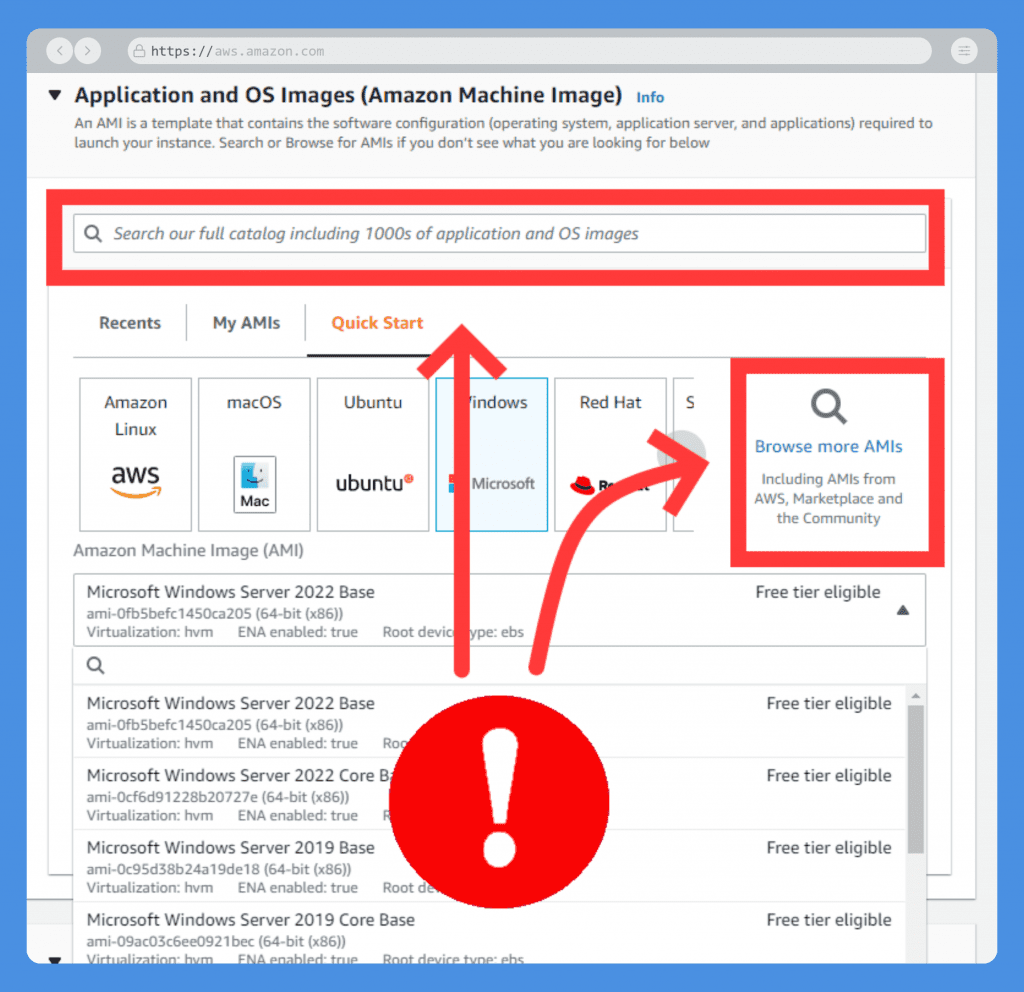
Be Careful!
If you search for a different AMI or click on “Browse more AMIs”, you’ll see a lot of configurations submitted by outside companies. They typically have a price associated with them that can be quite steep.
Select your Amazon EC2 Instance Type
The next area is where you choose an Instance Type. This is the power behind the server. Since we’re going for Free Tier, select “t1.micro” or “t2.micro” in the drop-down.
What does “t2.micro” mean? This is the size and horsepower of the instance you’re creating. Small instances (micro) tend to be free and are not meant for a production environment.
EC2 server instances types comprise of varying combinations of CPU, memory, storage, and networking capacity and are designed to fit different use cases. When you launch an instance, you can select its type based on your requirements. Each Amazon EC2 instance type offers different computing, memory, and storage capabilities.
There are five families of EC2 instance types: General purpose, Compute-optimized, Memory-optimized, Storage-optimized, and Accelerated computing.
General purpose instances are a good choice for many applications. These instances offer a balance of computing, memory, and networking resources.
Compute-optimized instances are designed for compute-intensive applications that require high-performance processors.
Memory-optimized instances are designed for memory-intensive applications and offer high levels of memory and CPU.
Storage-optimized instances are designed for storage-intensive applications that require high levels of input/output operations per second (IOPS).
Accelerated computing instances use hardware accelerators, or co-processors, to perform functions more efficiently than is possible in software running on CPUs.
Assign Your Key Pair
Remember that Key Pair you created first? You will need to assign to this instance at this point. Select the key pair from the drop-down that you just created. You’re almost done.
Adjust Network Settings
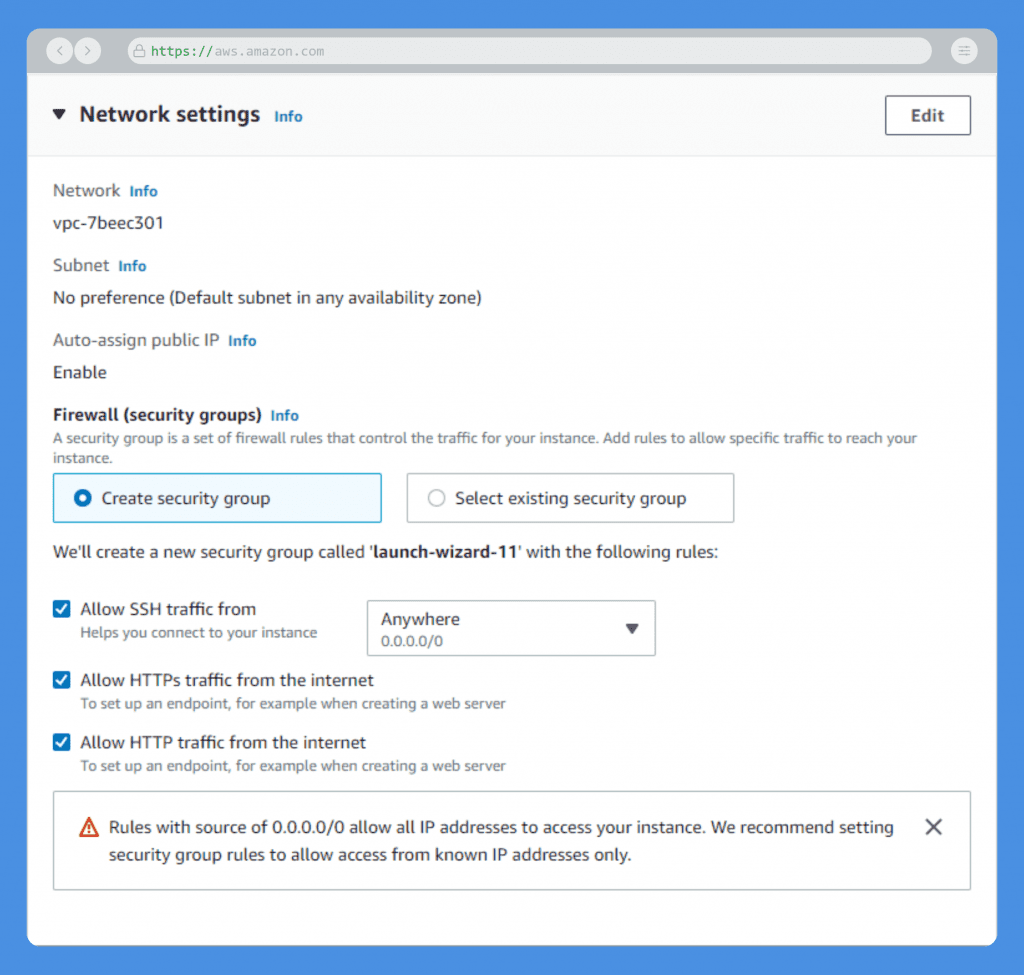
Checkmark the two bottom boxes that say “Allow HTTPs traffic from the internet” and “Allow HTTP traffic from the internet”.
Finally, click on the orange “Launch Instance” button on the right. Boom! Your server is being created! This will take a couple of minutes but we can continue with the configuration at the same time.
Step 3: Add an Elastic IP to Your Server
Let’s assign an Elastic IP address to your server instance.
Elastic IP addresses are reserved public IP addresses that you can assign to any Amazon EC2 instance in a particular region until you choose to release it. It’s how you’ll access your server using FTP, Remote Desktop, SSH, etc.
You’ll also use this address as the main IP address for a website domain within DNS.
In short, it’s your External IP address for the server.
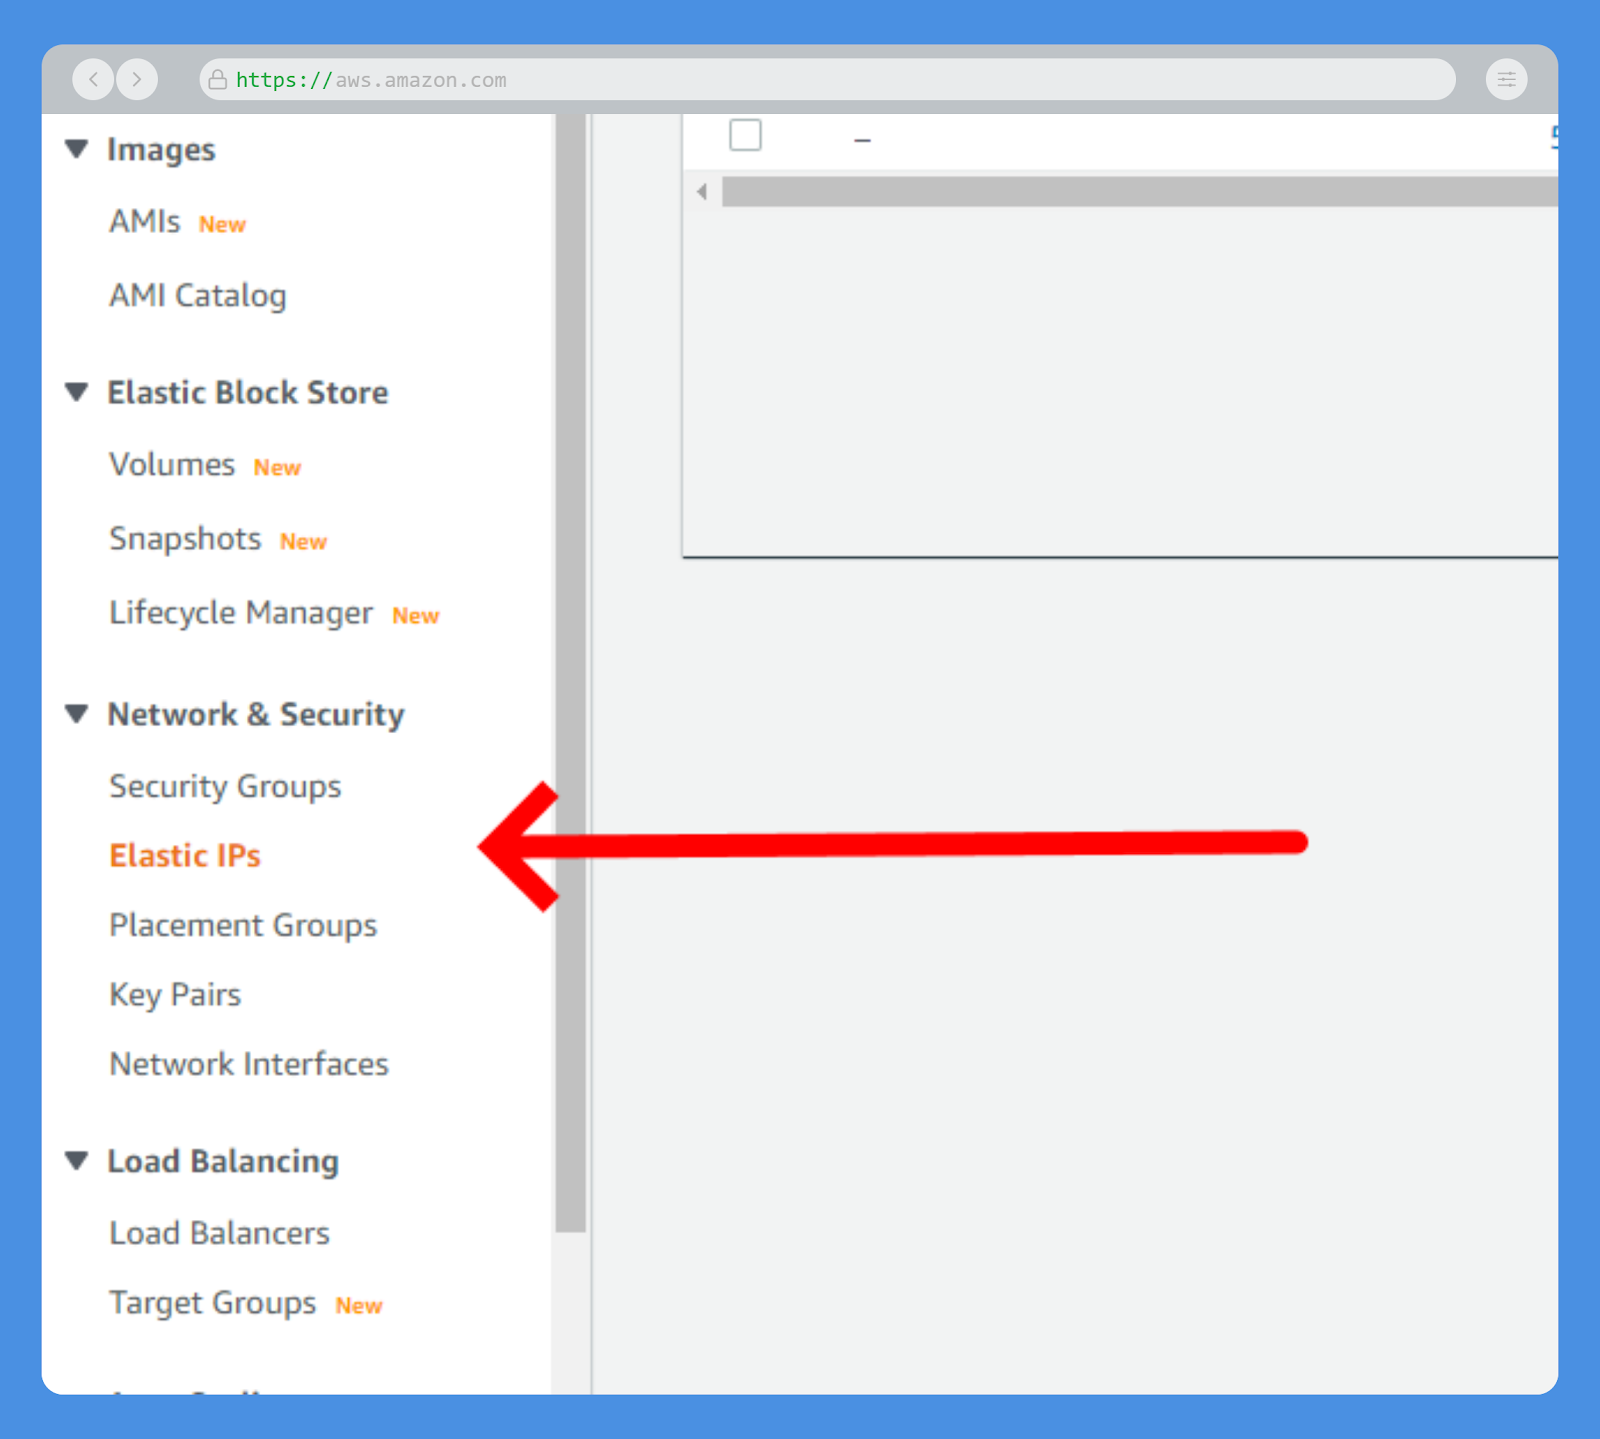
- In the left navigation column, under “Network & Security”, click on Elastic IPs.
OPTION 1
Your screen will probably be blank, but if there are Elastic IP addresses allocated to your account, you’ll see some here. They won’t have an Associated Instance ID value in that column like below. If there are no values on this screen or no unassociated Instance IDs, jump to OPTION 2.
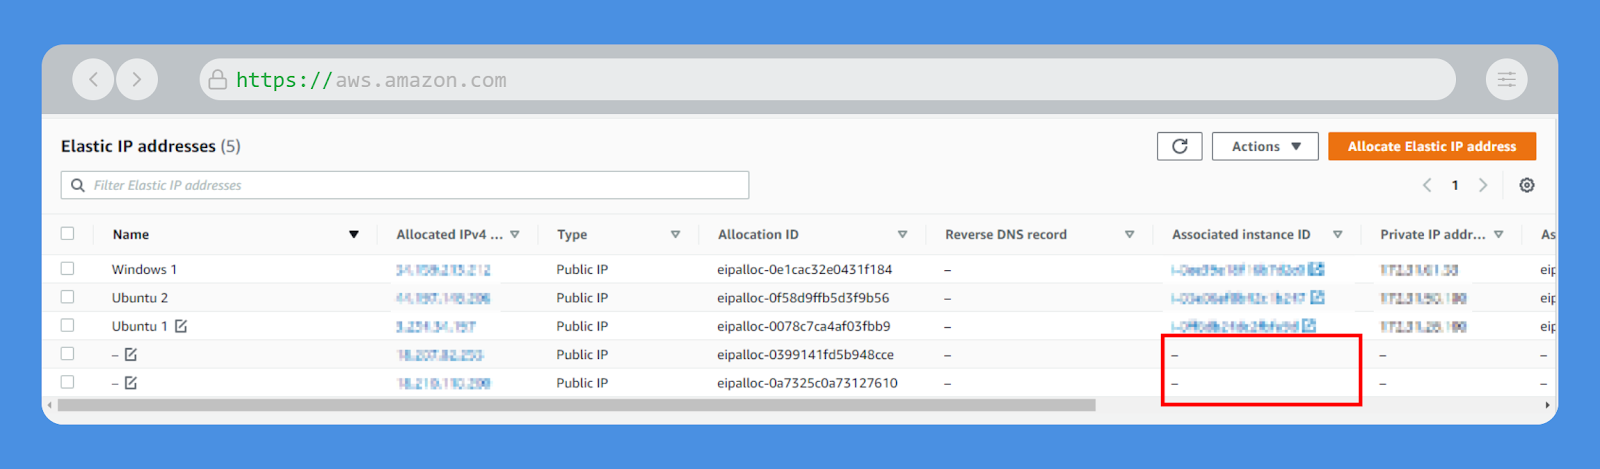
You can use those Elastic IPs for your new server. Just click on the IP address, and then click on the “Associate Elastic IP address” button.

Select an instance from the dropdown. The IP address then should populate in that respective field as well. You shouldn’t have to type anything in these fields.
Click on the “Associate” button at the bottom. You should be good to go.
OPTION 2
- From the main Elastic IP address screen, click on the “Allocate Elastic IP address” button in the top right corner of the main screen.
- The next screen will populate with the correct information already. Use “Amazon’s pool of IPv4 addresses”.
- Click on the “Allocate” button at the bottom.
- You should see the screen below. Select an instance from the dropdown. The IP address then should populate in that respective field as well. You shouldn’t have to type anything in these fields.
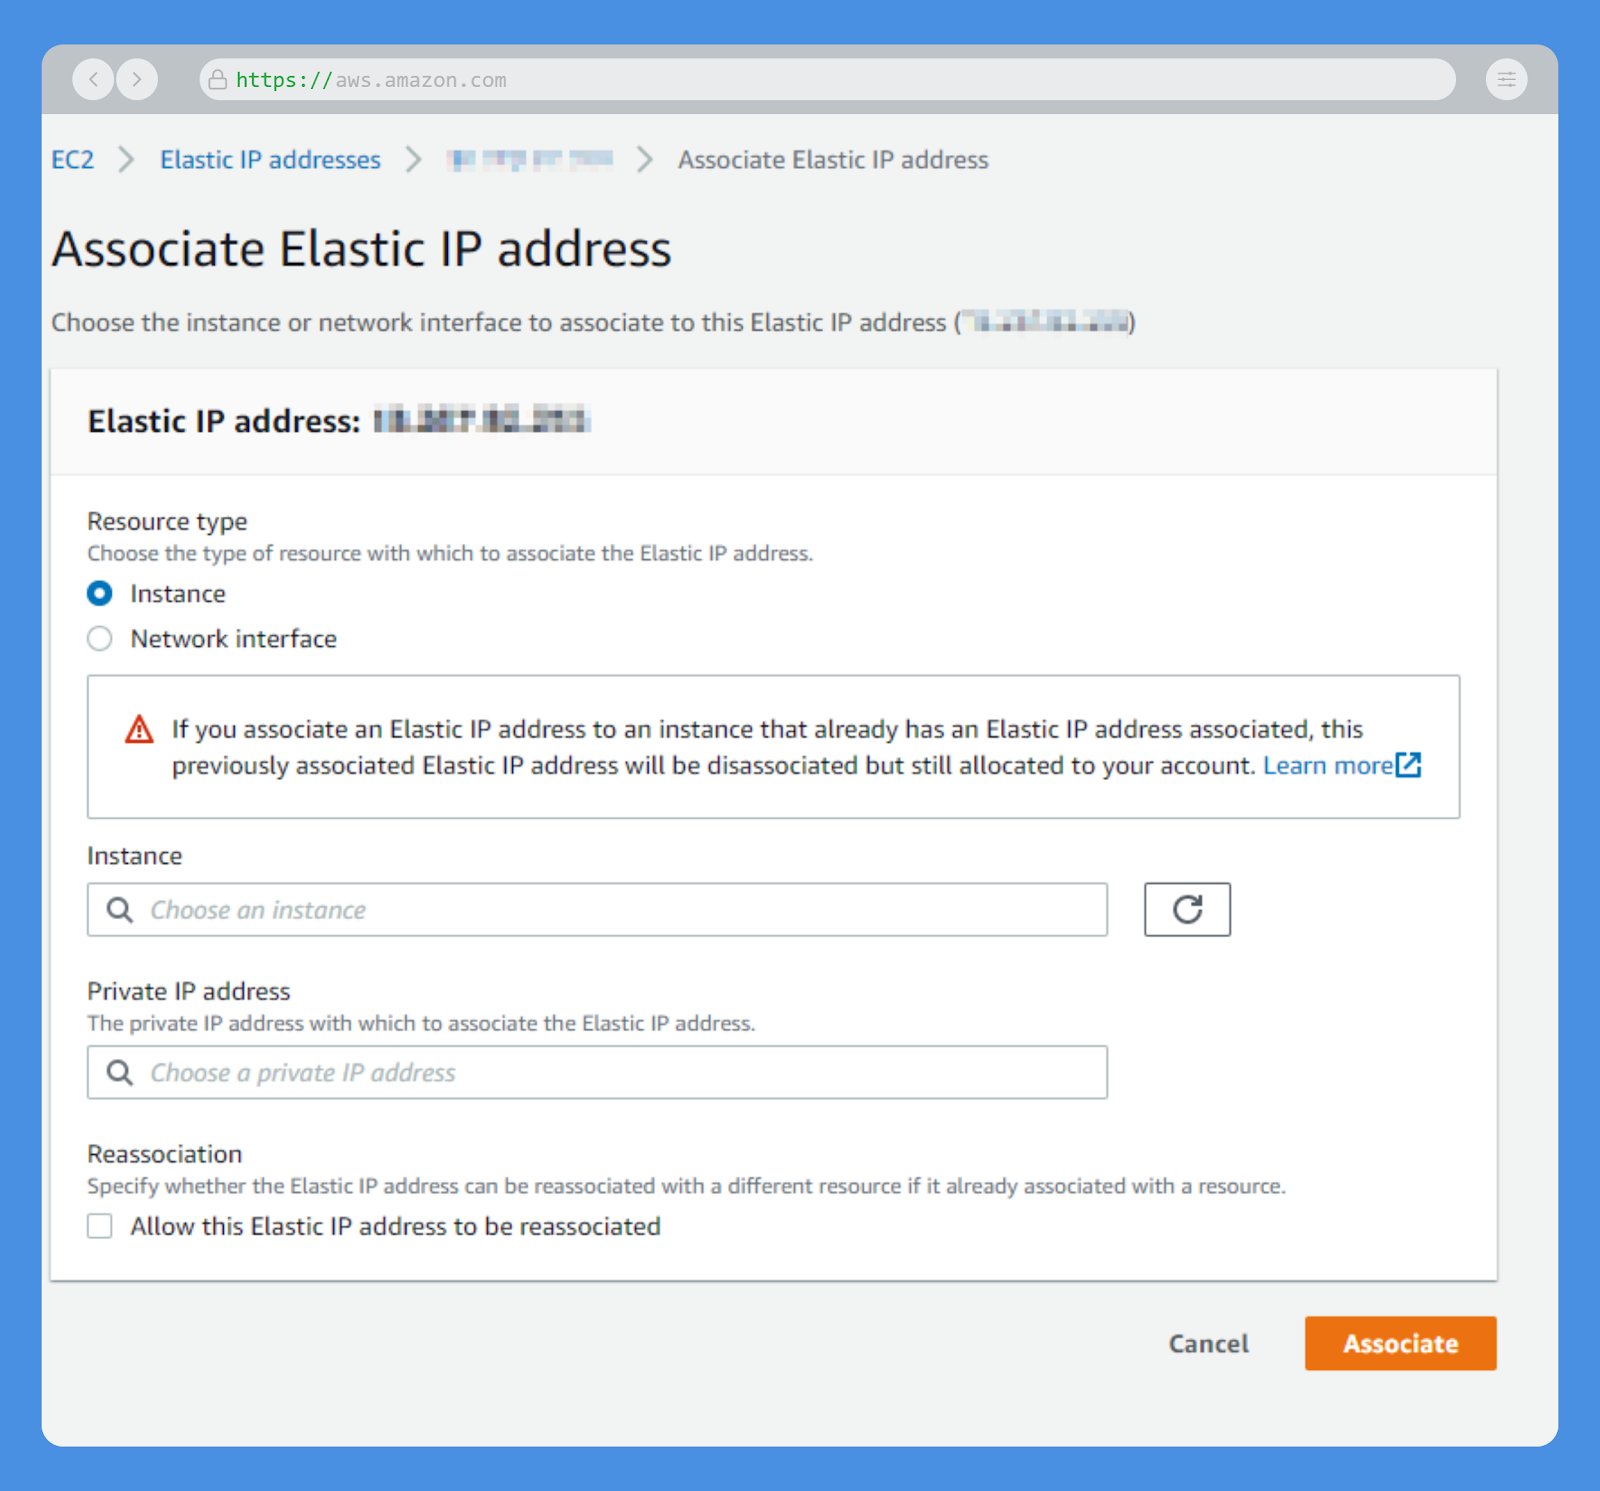
Click on “Associate” button at the bottom. You should be good to go.
This Elastic IP address value is what you add as an “A” record within your DNS settings when you’re ready to point a domain to your new server.
Step 4: Add Security Groups to Your Server
You actually already added a few Security Groups when you created your server.
Creating a security group is just the first step to securing your instance. You have to give the security group rules in order for it to do anything.
- In the left navigation column, under “Network & Security”, click on “Security Groups”.
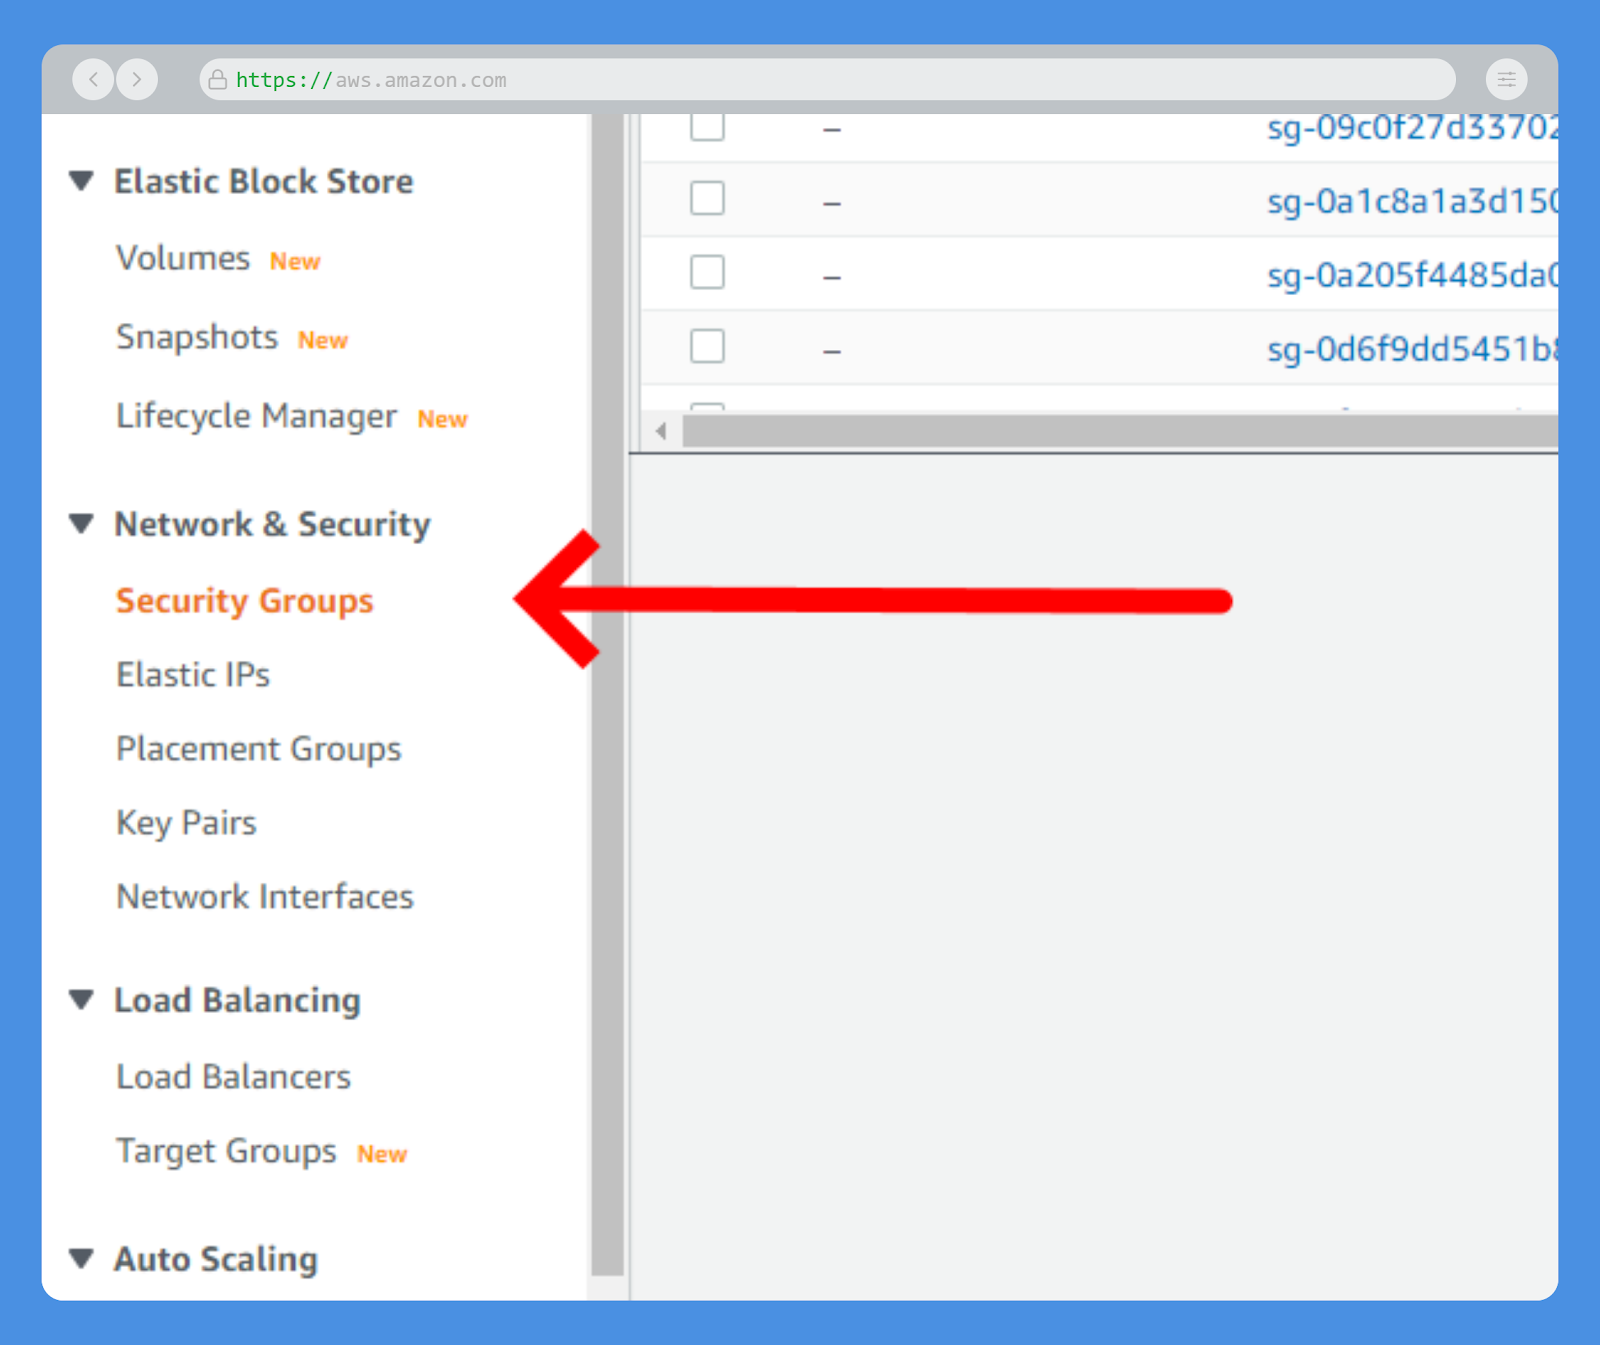
You probably have a Security Group in your list called launch-wizard-1 or something similar. Regardless of the name, click on it.
A Security Group is where you assign rules for your server. Kind of a router/firewall.
Also, AWS will create a new Security Group for each server instance you create. For maintenance purposes, you should consider just re-using groups so you don’t have too many and they don’t become a maintenance issue in the future.
Two Rule Types – Inbound and Outbound
You’ll need to create inbound rules and outbound rules for your server.
Inbound
Traffic coming INTO your server. When a person is requesting a webpage on your server, that is INBOUND traffic. The request is coming IN. Your server currently has no Inbound rules by default, so nobody can access anything on your server yet. All traffic will be blocked. We’ll fix that in a moment.
Outbound
Traffic originating on your server but sending OUT a request to another server for some reason.
We’re going to allow all outbound ports. Your AWS server should come like this as the default.
Incoming Rules to Set Up
If you have a Linux-based Server, add the following Inbound Rules. Click on the “Edit inbound rules” button to add them.
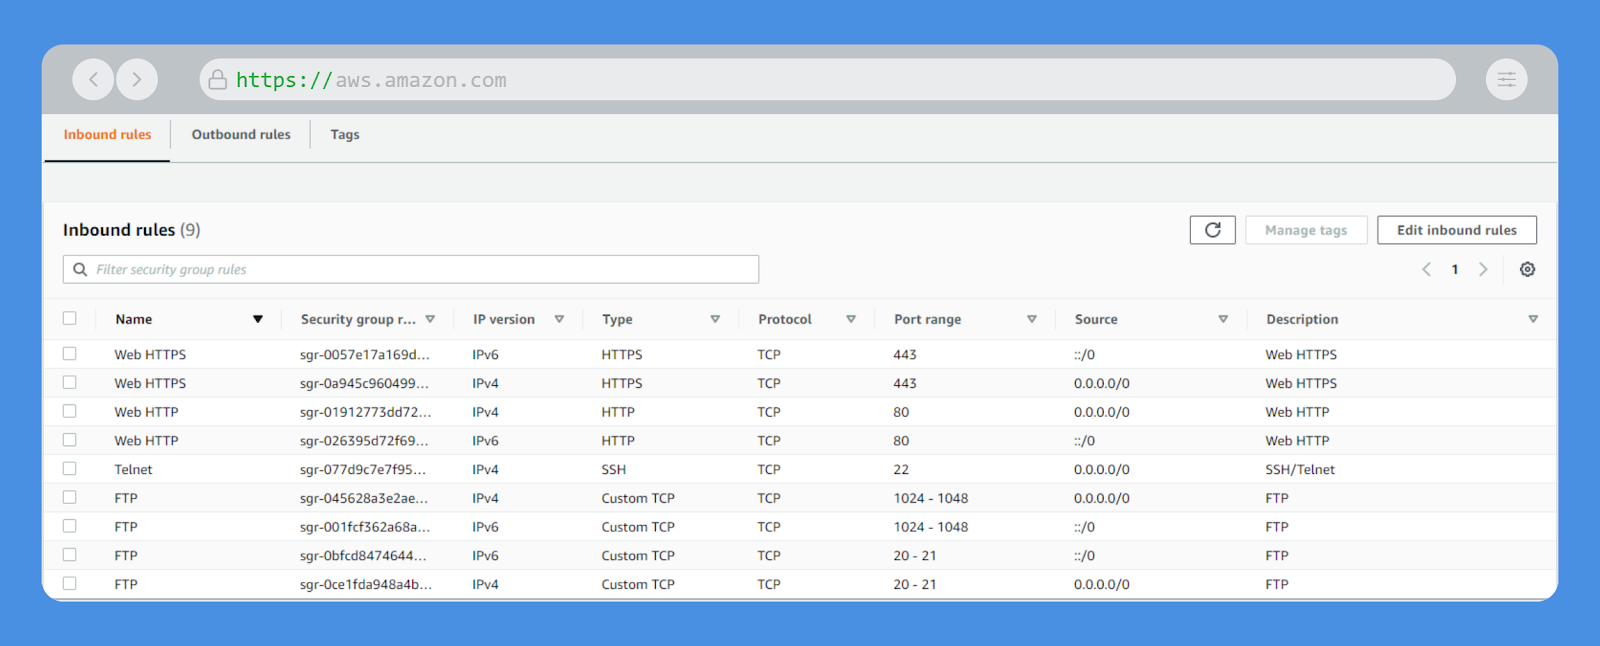
If you have a Windows-based Server, add the following Inbound Rules. Click on the “Edit inbound rules” button to add them.
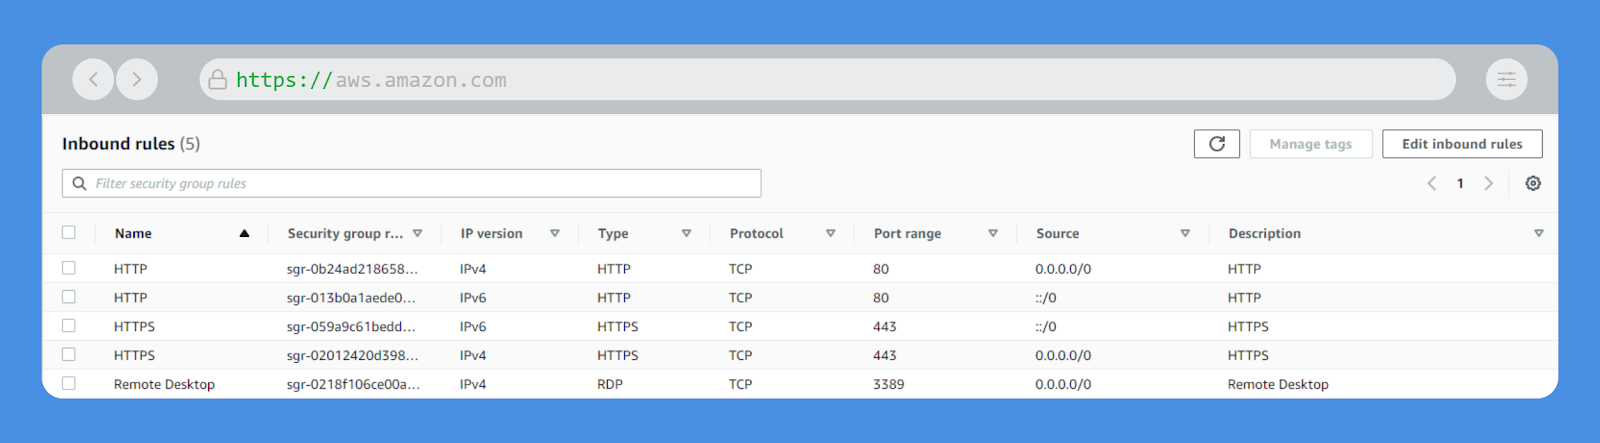
If you want to include FTP access on your Windows-based server, add it in as well.
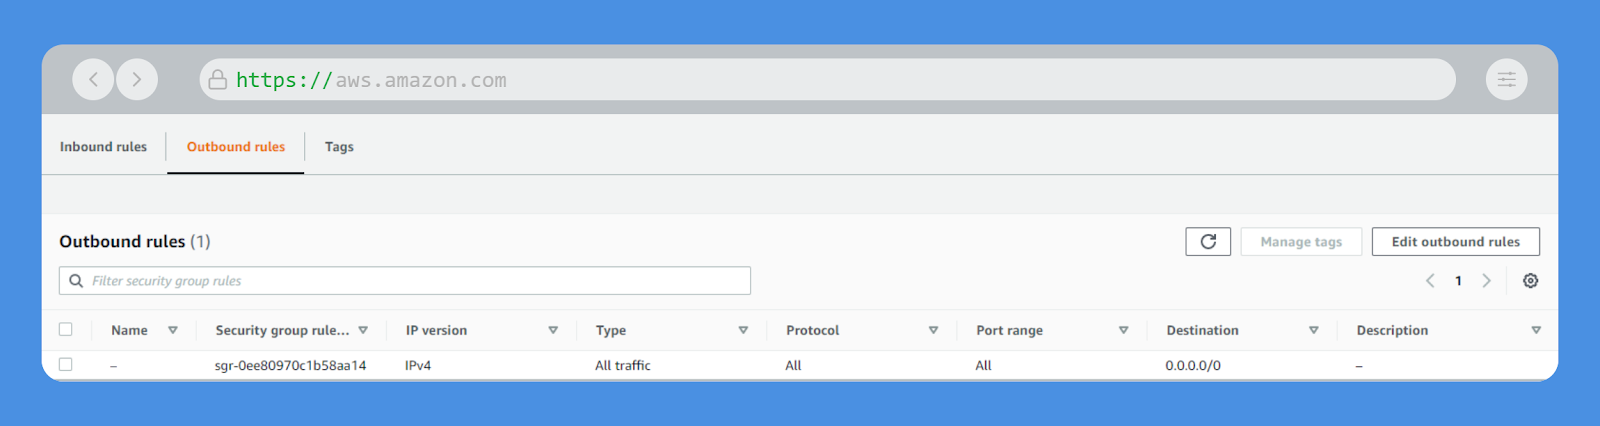
Outbound Rules to Setup
The below rules are standard for both Linux-based and Windows-based Servers. This should already be present, but add it if it’s missing, click on the “Edit outbound rules” button to add this one rule.
Congrats! People should now be able to access your server!
Step 5: Accessing Your Server
You are now free to add files, install your personal software, and configure your server however you want. But how do you do that? It depends on the operating system you chose when setting up your instance.
From your EC2 Instance screen (found in the left navigation), click on your Instance details, and find the value for “Public IPv4 DNS”. It should look something like “ec1-23-456-789-555.compute-1.amazonaws.com“. That is your official server name to use in most situations.
Windows-Based Server
You’ll probably want to set up a Remote Desktop Connection. For that:
- Go into your Instance details
- Click on the “Connect” button at the top of the page
- Click on the RDP client tab
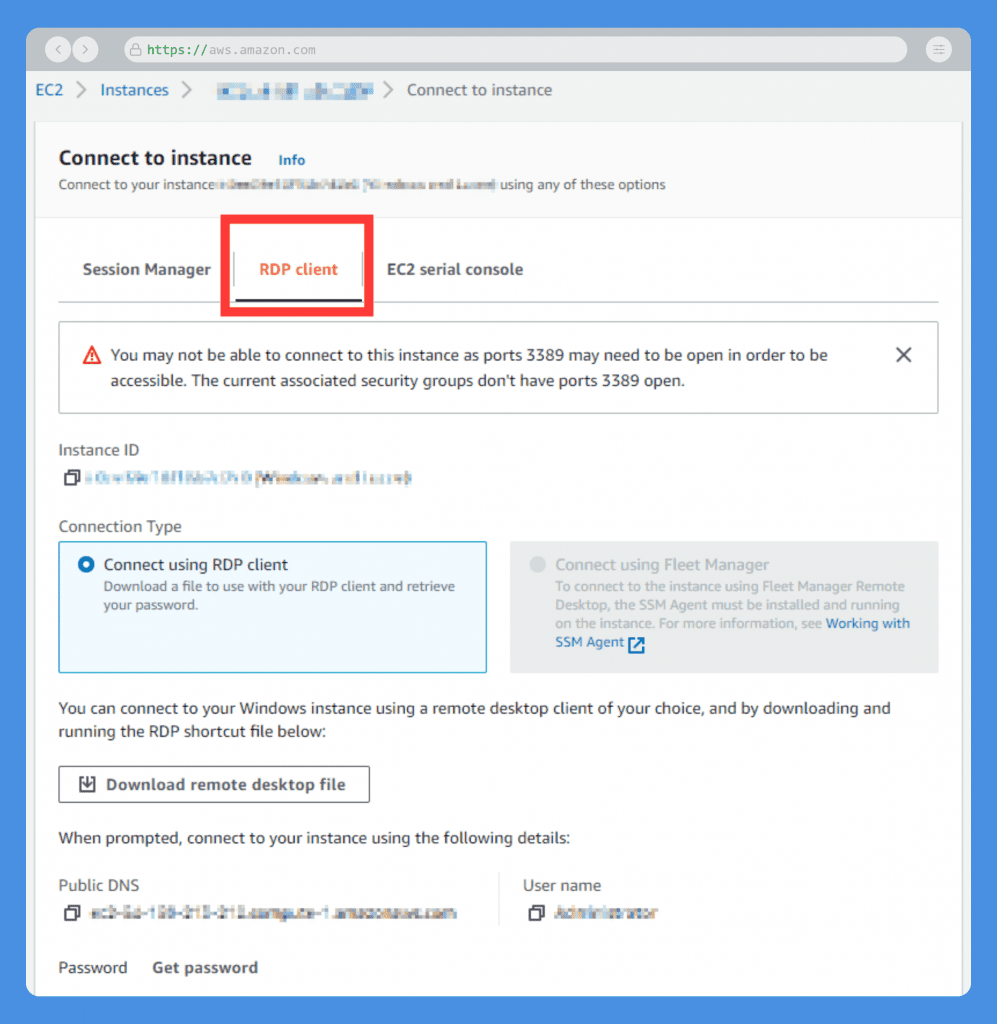
- Download the remote desktop file. You’ll want to take note of your “username”, and you need to generate your password value. For this, you need to enter your Key Pair and your password will be given to you.
You should be able to now click on your remote desktop file and use your credentials to access your new server!
Linux-Based Server
Your PEM file is fine for OpenSSH access, but for PuTTY use, you’ll need a PPK file. We can convert the PEM to a PPK file. Luckily the process is simple and has been documented here.
Step 6: Smart Items To-Do
Create an AMI
This isn’t required but certainly is good to have in case something happens to your server. It’s basically an image of the server that you can use as a restore point or for replication purposes if you want all the servers to be congruent.
The full instructions will be in a later blog post, but if you click on the “EC2 Image Builder” button at the top of the page, it will get you started.
Having an image of your server allows you can restore another server at exactly this point and configuration next time. Boom!
Setup a Monitoring Service
Go here to set up a free monitoring service. You need something to tell you if your server crashes and becomes unreachable. Trust us… you want this. If you create any scheduled jobs on your new server, you’ll want to monitor all your Cron jobs to make sure they are functioning as expected.
Once your website is up and running, be sure to add some free social proof to it so you can grow your audience!
Conclusion
Congratulations! You now have a fully functioning web server hosted in the cloud at AWS.
Please let me know if you have any questions at all and I will do everything I can to help you out.


